Ever wondered why everyone from elite athletes to wellness newbies is talking about a cold plunge you can set up in your own garage? The shock of ice-cold water can boost your mood, sharpen your focus, and leave you feeling unstoppable. But getting started isn’t always easy. You need the right setup, the right safety steps, and the right plan to stick with it.
In this guide, you’ll learn exactly how to set up a cold plunge at home. We’ll cover every option from cheap DIY builds to premium tubs that keep water icy 24/7. You’ll get practical tips on temperature, timing, and safety. By the end, you’ll know exactly what to buy, how to set it up, and how to make it a habit.
Step 1: Assess Your Options , DIY vs. Commercial Cold Plunge Tubs
Before you spend any money, you need to decide what kind of cold plunge setup fits your life. There are three main routes: a super cheap DIY stock tank, a mid-range insulated barrel, or a high-end plug-and-play tub with a chiller. Each has its pros and cons.
Let’s start with the DIY route. Many people build a cold plunge out of a chest freezer. You can find a used chest freezer on Facebook Marketplace for under $100. Then you need to seal the interior so it’s watertight. The common method is to use epoxy like Pond Shield and JB Water Weld on the seams. You also need a temperature controller like an Inkbird to keep the water at your desired temp. And you’ll need a circulation pump and filter to keep the water clean. Total cost can be under $500. But it takes work. You have to prep the surfaces, apply multiple coats of epoxy, and let it cure for a week. If done wrong, the seal can fail and you’ll have a mess.
Another DIY approach is using a livestock stock tank from Tractor Supply. These are made of heavy-duty plastic or galvanized steel. They’re cheap (around $80-$150) and big enough to sit in. You just fill them with water and add ice. But they’re not insulated, so the water warms up fast. You’ll need a lot of ice to keep it cold. This is a great way to try cold plunging without a big investment. As one YouTube creator put it, a stock tank is a great start if you’re on an ultra budget.
Then there are commercial options. The most basic are portable cold plunge pods made of PVC and insulation. These usually run $100-$300. They’re easy to set up and break down, but they don’t hold temperature well. You’ll still need to add ice. A step up is an insulated barrel like the Ice Barrel 300. It holds cold longer and some models can be upgraded with a chiller later. But they cost $1,000 or more.
At the top end are premium cold plunge tubs with built-in chillers. Brands like Plunge, Morosu, and Edge Theory Labs make units that plug into a standard outlet and keep water at a precise temperature 24/7. The Plunge Gen 1 models, for example, require a flat surface that can support 1,200 pounds. They need a 5-foot clearance from other appliances and 12 inches behind the tub for the chiller. They use a carbon hose filter for water treatment. No chemicals needed. These tubs range from about $4,000 to $10,000. They’re the most convenient, but they’re a big investment.
To help you choose, here’s a quick table:
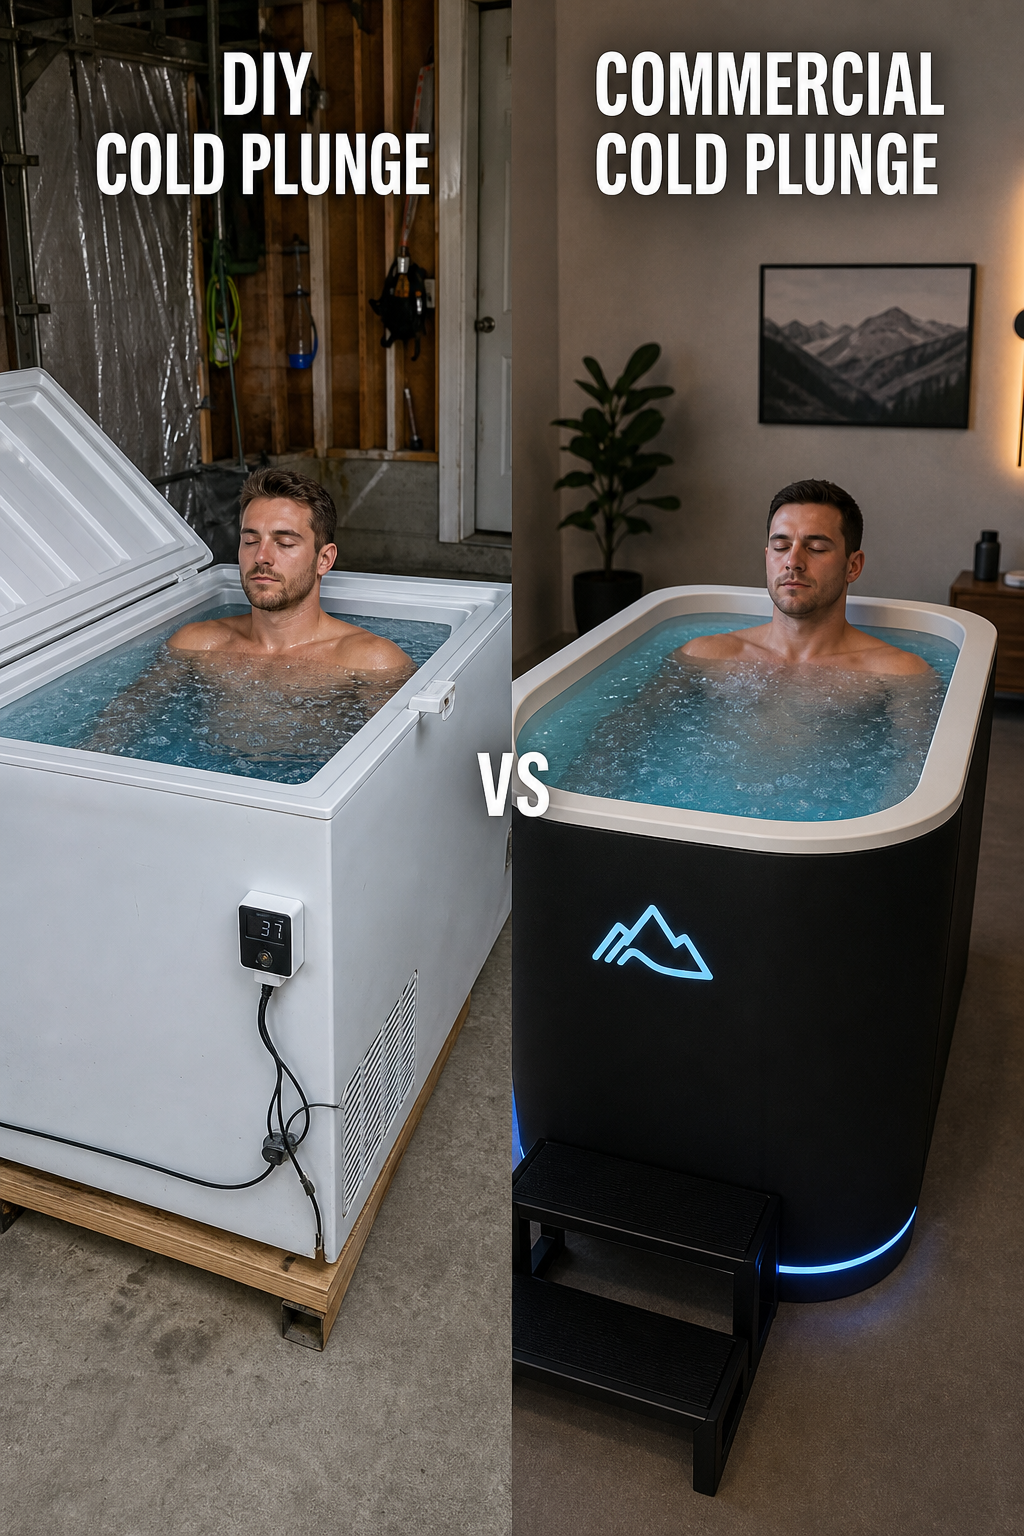
Bottom line: The best option for a cold plunge at home matches your budget and your willingness to maintain it; if you want hassle-free, go commercial; if you’re handy, DIY saves money.
Step 2: Gather Equipment and Set Up Your Plunge System
Once you’ve chosen your route, it’s time to set up. For a DIY chest freezer build, you’ll need:
- A chest freezer (5-7 cubic feet minimum, 7+ is better for taller people)
- Epoxy coating (Pond Shield or similar non-toxic pond liner epoxy)
- JB Water Weld for sealing seams
- Self-etching primer if you have bare metal
- Temperature controller (Inkbird ITC-308 or similar)
- Circulation pump (submersible aquarium pump, 400+ GPH)
- Water filter (canister filter with carbon or sponge)
- Hose and fittings
- Insulation (rigid foam or spray foam for the lid and sides)
Start by cleaning the freezer interior thoroughly. Remove any ice, dirt, or rust. Sand rough spots with 60-grit sandpaper. If you have exposed metal, apply a self-etching primer first. Then mix the Pond Shield epoxy according to the instructions. Apply it with a roller that’s meant for epoxy , cheap rollers will shred. Let it cure for 7 days , don’t skip this. The manufacturer says 24 hours, but experienced DIYers recommend a full week for durability.
Drill a hole for the temperature sensor and another for the pump hose. Use grommets to seal them. Install the Inkbird controller, placing the probe in the water. Set your desired temperature (start around 55°F). The controller will turn the freezer on and off to maintain that temp.
For a commercial tub like the Plunge Gen 1, setup is simpler but heavier. The unit needs to be placed on a flat surface that can support 1,200 pounds. That means concrete, not wooden decking unless it’s reinforced. Leave 5 feet of clearance from other appliances and 12 inches behind the tub for the chiller. Connect a garden hose to the fill valve and run water until it’s clear. The built-in carbon filter removes debris. Let the chiller rest for 4 hours before turning it on. Then plug into a standard 110-120V GFCI outlet. Use a 12-gauge extension cord if needed, up to 25 feet per NEC.
Bottom line: Setting up a cold plunge at home requires careful preparation, whether you’re sealing a freezer or siting a premium tub; following the manufacturer’s instructions is critical to avoid leaks and electrical hazards.
Step 3: Maintain Water Quality and Temperature Efficiently
Your cold plunge won’t stay nice if you don’t take care of the water. Dirty water can cause skin irritation or even illness. Let’s break down how to keep it clean and cold.
For water quality, the easiest method is to use a carbon filter on your fill hose. That’s what the Plunge Gen 1 uses , a simple carbon hose filter that removes chlorine and sediment. Run the water until it’s clear before filling. After that, you can add a small amount of hydrogen peroxide (not bleach) to disinfect. Use about 1 cup per 50 gallons per week. Or you can use a UV sterilizer inline with your circulation pump. UV kills bacteria without chemicals.
If you’re using a DIY freezer setup, filtration is more involved. You need a circulation pump and a filter. Many people use a pond filter with filter media like sponge or filter floss. Clean the filter every 2-3 days at first, then once a week once the water is stable. Change the water completely every 2-4 weeks depending on use. If one person plunges daily, change monthly. If more people, change more often.
Maintaining temperature is easier with a chiller or temperature controller. For a freezer, the Inkbird set to 50°F will keep the water within a degree. For a commercial tub, the chiller adjusts automatically. But if you’re using ice alone, you’ll need to add ice multiple times a day. That gets old fast. That’s why many people eventually upgrade to a chiller. Chillers range from $500 to $2,000. A 1/3 HP chiller can keep a 100-gallon tub at 45°F even in hot weather.
To save on electricity, insulate your tub well. For a freezer, add rigid foam insulation around the outside and on the lid. For a barrel, buy the insulated version. The Ice Barrel 300 has a double-wall design that helps. Also place your plunge in a shaded area out of direct sun. In the desert heat of Coachella Valley, this is especially important. Emerge Cold Plunge – Luxury Hot Tubs offers models designed for high temperatures.
Bottom line: Clean water and stable temperature are the keys to a great cold plunge at home; invest in a good filter and a chiller or temperature controller to minimize effort.
Step 4: Safety Precautions and Best Plunge Protocols
Cold water is no joke. You need to be smart about it. Here are the safety rules you must follow.
First, never hold your breath underwater. The cold shock response can cause involuntary gasping. If you hold your breath, you risk drowning. Always keep your face above water and breathe normally. If you’re doing breathwork, do it before you get in, not during.
Second, know your limits. If you have a heart condition, high blood pressure, or are pregnant, talk to your doctor first. The cold causes blood vessels to constrict and increases heart rate. That stress can be dangerous.
Third, start slow. Water temperature should be between 50°F and 60°F for beginners. Many experts recommend 55°F as a starting point. Stay in for 1-2 minutes. The co-founder of Plunge, Ryan Dewey, suggests aiming for 11 minutes total in your first week, spread out over 4-5 sessions. Listen to your body. If you feel numbness, pain, or uncontrollable shivering, get out.
Fourth, never plunge alone. Have someone nearby in case you get into trouble. Even experienced plungers have had incidents.
Fifth, warm up properly afterward. Have a warm towel, robe, or heated space ready. Don’t jump straight into a hot shower , that can cause blood pressure to drop rapidly. Instead, do light movement like walking, push-ups, or use a sauna. The contrast of cold and heat can amplify the benefits. In fact, a contrast bath (hot then cold) is a common recovery practice.
Finally, don’t plunge when you’re sick or under the influence of alcohol or drugs. Your body is already stressed, and adding cold can cause problems.
For more on the science of cold exposure, including brown fat activation, seethis article on cold plunge benefits and brown fat.
Bottom line: Safety is the most critical part of a cold plunge at home; follow the rules on temperature, duration, and never plunge alone to prevent accidents.
Step 5: Enhance Your Experience with Accessories and Recovery
A cold plunge can be more comfortable and effective with the right accessories. Let’s look at what’s available.
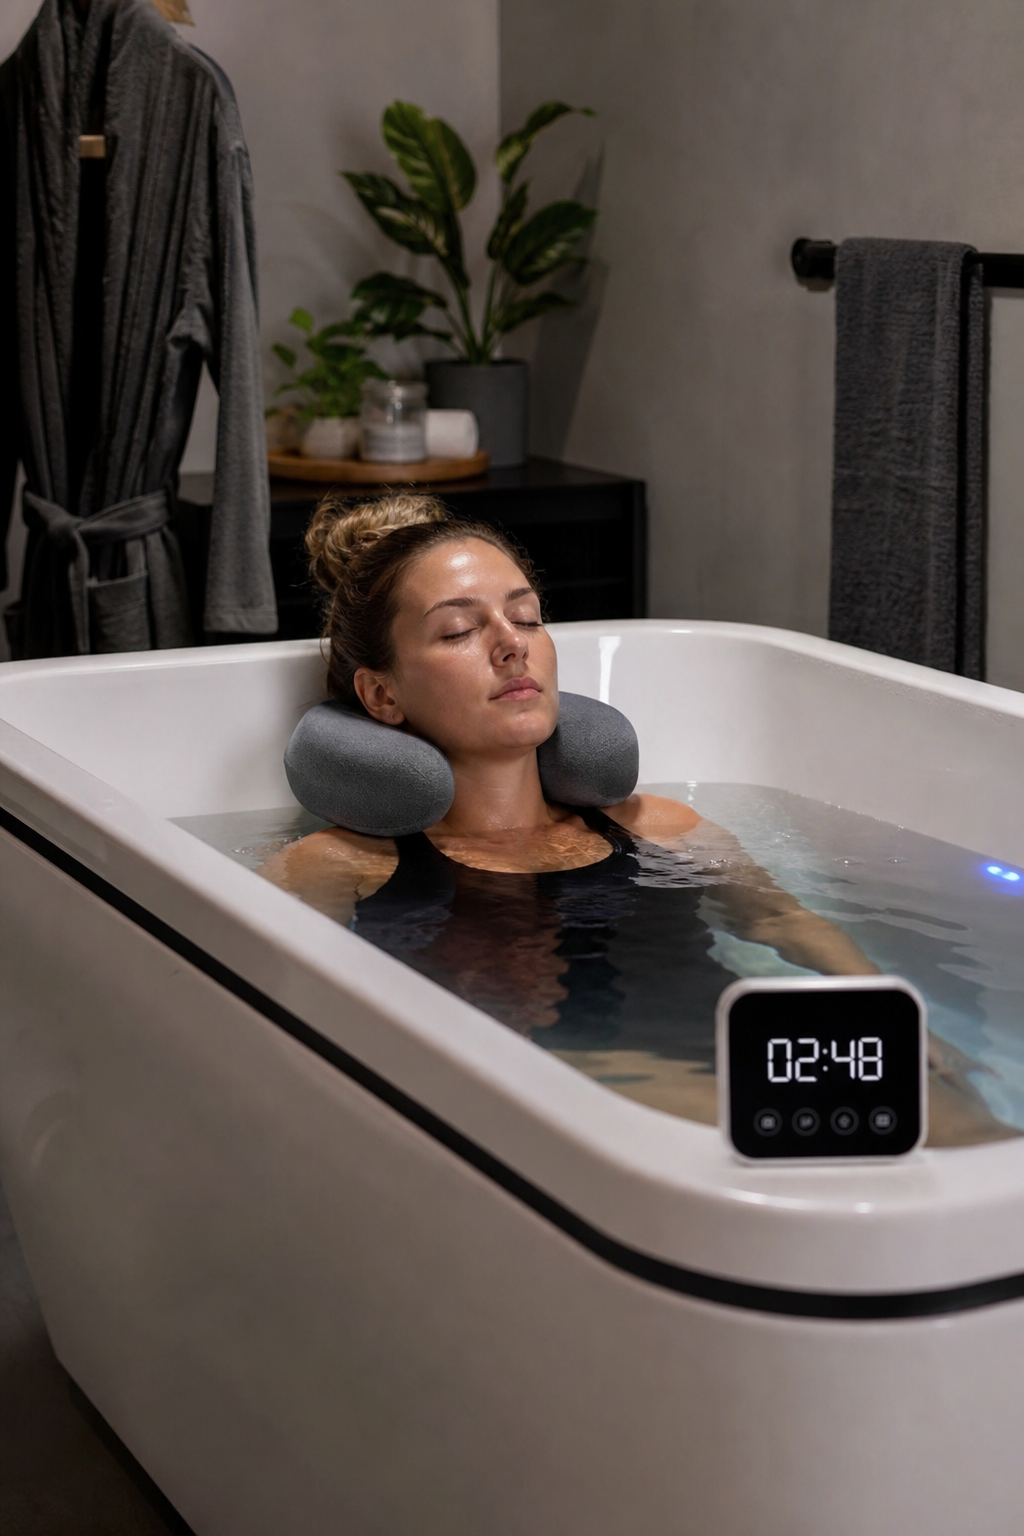
A neck pillow is a simple addition that makes a big difference. The Plunge neck pillow, for example, is designed to let you relax your head back while in the tub. It’s made of closed-cell foam that won’t soak up water. You can find similar pillows on Amazon for under $30.
Another helpful accessory is an ergonomic step or stool to make getting in and out easier. Cold water can make your muscles tense, and a slippery floor is dangerous. A non-slip mat or decking is also a good idea.
If your plunge has a chiller, you can add a wifi controller or app to adjust temperature remotely. Some premium tubs come with apps. The Plunge has its own app that lets you set temperature and timer.
For recovery, pairing cold plunge with a sauna is popular. The heat-cold contrast can boost circulation and endorphins. If you have space, consider adding a small infrared sauna near your plunge. Some people even install an outdoor shower with a barrel to rinse off after.
Post-plunge, warm up with light exercise like jumping on a mini trampoline, doing jumping jacks, or some yoga. That helps the body warm up naturally.
You can also monitor your heart rate with a waterproof fitness tracker to see how your body responds. Some users find that cold plunging improves sleep if done in the morning or early afternoon. Avoid plunging late at night, as it can raise alertness.
Bottom line: Small accessories like a neck pillow and post-plunge recovery routine can turn your cold plunge at home from a shock to a ritual you look forward to.
Step 6: Troubleshooting and Long-Term Care
Even with the best setup, things can go wrong. Here are common issues and how to fix them.
Problem: Water gets cloudy or smelly. This is usually bacteria. Increase your sanitizer (hydrogen peroxide or bromine). Check your filter , clean or replace it. Also, make sure you’re changing the water regularly. In a DIY setup, water should be changed every 2-4 weeks. In a commercial tub, the carbon filter helps, but you still need to add sanitizer.
Problem: Temperature is inconsistent. For a freezer, check the Inkbird probe. Make sure it’s submerged and not touching the metal sides. For a chiller, check that the coolant lines aren’t blocked. Also ensure the chiller has proper airflow , it needs that 12-inch clearance we mentioned. In hot weather, a chiller may struggle to keep up. Add insulation to the tub and reduce water volume if possible.
Problem: Leaks. For DIY builds, the most common leak point is around the drain plug. Many builders epoxy the plug in place permanently. If you have a leak, drain the tub, dry it, and reapply epoxy over the seam. A test fill before final use is crucial.
Problem: Chiller is loud. Some chillers vibrate. Place it on a rubber mat to dampen noise. Or consider a chiller with a built-in sound damper. The Plunge chiller is relatively quiet, but any refrigeration unit makes noise.
Long-term care: Replace the carbon filter on your fill hose every 6 months or as needed. Clean the chiller coils annually with a soft brush. For a freezer, check the seal around the lid each month , cold air escaping wastes electricity. Also, keep the area around the plunge clean to prevent debris from getting in.
If you use a chemical sanitizer, test the water weekly with test strips to maintain proper levels. Pools and spa maintenance principles apply to cold plunges too.
For more detailed troubleshooting, checkthis guide on fixing common cold plunge issues.
Bottom line: Troubleshooting your cold plunge at home is straightforward if you know what to look for; address water quality, temperature, and leaks early to keep your setup running smoothly.
Frequently Asked Questions
How long should you cold plunge for beginners?
Start with 1-2 minutes at a water temperature of 55-60°F. The key is to breathe calmly and stay relaxed. As you adapt, you can increase to 3-5 minutes. Aim for 11 minutes total in your first week, spread over 4-5 sessions. Never push through pain or numbness. If you feel dizzy or sick, get out immediately. Consistency is more important than duration.
What is the ideal temperature for a cold plunge at home?
The ideal temperature depends on your experience. Beginners should start at 55-60°F. Intermediate users often prefer 50-55°F. Advanced plungers go down to 39-45°F. Any lower and you risk hypothermia. The Plunge team suggests starting at 55-60°F and going colder as you get comfortable. Your body will adapt over weeks. Keep a thermometer in the water to check.
Can I use a hot tub instead of a cold plunge?
No, a hot tub is designed to heat water, not cool it. You could fill it with cold water, but it would quickly warm up to ambient temperature. Also, hot tubs have heating systems that may turn on automatically. If you want cold water, you need a dedicated cold plunge or a chiller. Some people use a hot tub in winter by turning off the heat, but it’s not consistent.
Do I need chemicals to keep a cold plunge clean?
It depends on your setup. If you use a carbon filter and change water frequently, you might not need chemicals. But for longer use between changes, a small amount of hydrogen peroxide (not chlorine) can prevent bacterial growth. Some commercial tubs use UV or ozone instead of chemicals. Always follow the manufacturer’s recommendations. Test the water weekly for pH and sanitizer levels.
How often should I change the water in my cold plunge?
For a DIY setup without filtration, change the water every 1-2 weeks. With a good filter and sanitizer, every 3-4 weeks. For a commercial tub with carbon filtration and UV, you can go 1-2 months. The Plunge Gen 1 uses a carbon hose filter only, so many users change water monthly. If the water starts to smell or look cloudy, change it sooner.
Can I cold plunge if I have high blood pressure?
Consult your doctor first. Cold water causes blood vessels to constrict and temporarily raises blood pressure. For some people, that’s a risk. However, regular cold exposure may improve circulation over time. Your doctor can advise based on your specific condition. If you get the go-ahead, start with very short plunges (30 seconds) and monitor how you feel.
What’s the best time of day for a cold plunge at home?
Most people prefer morning plunges because the cold shock can boost alertness and mood for the day. Some use it post-workout for recovery. Avoid plunging late at night because it increases heart rate and can interfere with sleep. If you pair it with a sauna, use the sauna first, then plunge. Listen to your body , if you feel too energized after, stick to mornings.
Is a DIY chest freezer cold plunge safe?
Yes, if done correctly. The main risks are electrical shock and freezing. Use a GFCI outlet and ground fault protection. Ensure the temperature controller is reliable , a stuck controller could freeze the water solid. Seal the interior properly to prevent leaks and rust. Always have someone nearby when you plunge. Many DIYers have used freezer plunges safely for years with proper precautions.
Conclusion
Setting up a cold plunge at home is doable for almost anyone. You don’t need to spend thousands to enjoy the benefits. A simple stock tank with ice or a DIY chest freezer can get you started for under $200. If you want convenience and consistent cold, a premium tub like the Plunge is worth the investment.
Remember the key steps: choose your setup wisely, install it correctly, maintain water quality, prioritize safety, and make it a habit. Small enhancements like a neck pillow and a sauna can turn the experience into a luxurious ritual.
If you’re in the Coachella Valley and want a professional recommendation, contact Luxury Hot Tubs for expert advice on cold plunge installation and water care. They serve Palm Desert, La Quinta, Indian Wells, and beyond. Their team handles everything from site planning to maintenance, so you can focus on recovery.
Start your cold plunge journey today. Your mind and body will thank you.