Thinking winter’s just a cover-and-forget job for your hot tub? Think again , a proper winterization saves you from cracked pipes, busted pumps, and costly repairs. Let’s walk through the exact steps you need to keep your spa safe all season long. In this guide, you’ll learn everything from turning off the power to securing the cover, based on expert advice from top manufacturers like Caldera Spas.
Even in scorching desert winters, a hot tub can survive the freeze‑thaw cycle without a single cracked pipe, if you follow the exact step‑by‑step checklist that Caldera®Spas engineers built into their own models. Here’s how to do it right the first time.
Step 1: Shut Off Power and Prepare the Plumbing
Before you touch a single drop of water, kill the power. Go to your home’s breaker panel and flip the GFCI breaker that feeds the hot tub. Turning off the topside control panel is not enough, you need to cut all electricity to the unit. Water and electricity don’t mix, and even a small leak onto a live component can cause serious injury. As Jacuzzi’s guide on breaker tripping warns, moisture in the breaker box can come from many sources, so keep the area dry. Once the breaker is off, unplug the spa if it’s a plug‑in model.
Next, open the equipment access panel. You’ll see the pump(s), heater, and a tangle of PVC pipes. Locate the unions, the large plastic nuts that connect the pump to the plumbing. Loosen them by hand (or with a wrench if they’re tight) but don’t remove them completely. This allows any water trapped in the pump housing to drain out. Also remove the drain plug on the pump itself, usually a small plastic knob at the lowest point. , leaving these unions loose prevents pressure buildup from any residual water that might freeze.
Don’t forget the heater. Most heaters have small drain plugs or caps. Remove those too. If your tub has a circulation pump, repeat the process. Every drop you can get out now is one less that can freeze. Once everything is loose, wipe up any puddles inside the equipment bay. A dry cabinet is a happy cabinet.
One more thing: if your hot tub has an air blower, you need to drain it as well. Cover the tub, turn the breaker back on, run the blower for about 30 seconds, then turn everything off again. This forces water out of the blower lines. Check your owner’s manual for exact steps.
Step 2: Completely Drain the Water
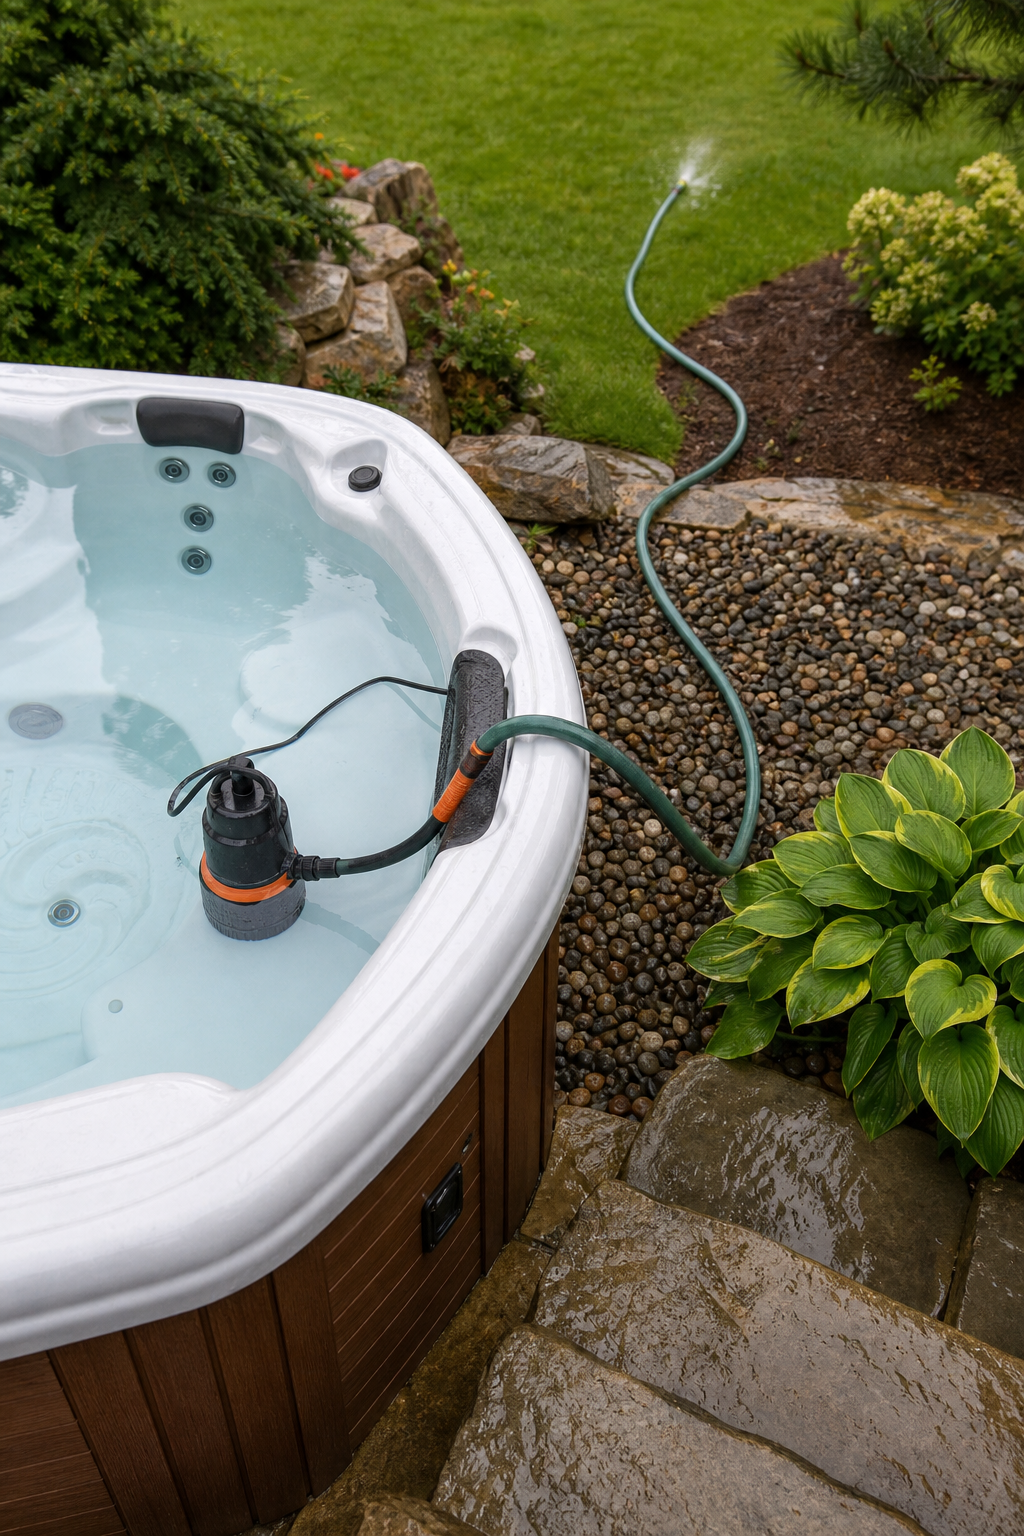
Now that the power is off and unions are loose, it’s time to drain the tub. Start with the built-in drain valve. Attach a garden hose and open the valve. Gravity will pull most of the water out, but it’s slow. A faster method is to use a submersible sump pump. Place it in the deepest part of the footwell and run the discharge hose to an appropriate location, away from foundations and plants that can’t handle high chlorine levels. Remember that a typical hot tub holds 300, 500 gallons, so plan your drainage area accordingly. As noted in Swim University’s winterization guide, you should also open all jet diverters and set them to the middle position to help water escape from all zones.
Once the main body of water is gone, about an inch or two will remain in the bottom. Use a wet/dry shop vac (suction mode) to remove the last of it. Pay special attention to the footwell and any seats that hold water. Every bit you vacuum out reduces the risk of ice damage. If you have a secondary drain valve, open that too to let trapped water out of the internal lines.
While the tub is empty, now’s the perfect time to clean the shell. Use a non-abrasive cleaner or a mixture of white vinegar and baking soda to scrub away any scum line at the water level. Rinse thoroughly and vacuum up the rinse water. A clean shell prevents stains and odors during storage.
Step 3: Remove and Deep Clean the Filters
With the tub empty, pull out all filter cartridges. Never leave dirty filters in a drained spa, they can grow mold and smell awful come spring. Remove them and give them a preliminary rinse with a garden hose to knock off loose debris. Then, soak them in a dedicated filter cleaner solution for at least 24 hours. Products like AquaDoc’s filter cleaner are designed to dissolve oils and grime. Use a large bucket or trash can big enough to submerge the filters completely. After soaking, rinse again until the water runs clear. Let the filters air dry completely before storing them indoors in a clean, dry place. If the filters are worn or damaged, replace them with new ones, it’s cheap insurance.
While the filters are soaking, clean the filter housing inside the spa. Vacuum out any standing water in the filter wells using your shop vac. You can also use a towel to dry the area. This step matters because any water left here can freeze and crack the housing.
For a deeper clean, consider adding a line flush product to the water before draining. This breaks down biofilm inside the pipes. But since you’ve already drained, it’s less critical. Still, if you want to be thorough, you can add line flush to the small amount of water remaining, run the pumps briefly (with power on, but be careful), then drain again. Check your owner’s manual for compatibility.
If you’re interested in the long-term benefits of proper filter maintenance, see our Hot Tub Buying Guide for tips on choosing a model with easy-to-clean filtration.
Step 4: Blow Out All Plumbing Lines

This is the most critical step. If you leave any water in the pipes, it can freeze and crack them. You’ll need a shop vac with at least 5 horsepower and a blower function. Some models have a switch to toggle from suction to blow. If yours doesn’t, you can buy a reversing adapter. Insert the hose into the filter housing and turn on the blower. You should see water spray out of the jets. Work your way around the tub, inserting the hose into every jet, drain, and diverter valve opening. As demonstrated in many professional winterization guides, blow for 10, 15 seconds per opening. Then go back and do it again, some water will reappear as trapped pockets shift.
After blowing, switch the vac to suction mode and vacuum out any puddles that formed in the footwell. Don’t skip this, water that collects in the bottom can wick back into the low jets. If you have a waterfall feature, set the diverter to one side, blow, then turn to the other side and blow again. Repeat until no water comes out.
One tip from the research: only 42% of winterization guides list the tools you need, so plan ahead. Make sure you have a powerful shop vac and a good set of attachments. A cordless vac won’t cut it, you need the suction of a corded 5‑HP model.
Step 5: Add Antifreeze to Protect Jets and Lines
After blowing out all the lines, you’ve removed 99% of the water. For that last 1%, add a layer of insurance: non‑toxic antifreeze. Never use automotive antifreeze (ethylene glycol), it’s poisonous. Instead, buy a high‑grade marine or RV antifreeze (propylene glycol) that’s safe for potable water systems. Pool‑grade antifreeze works too. Pour one gallon directly into the filter housing. Then, use a spray bottle or a small weed sprayer to inject antifreeze into each jet opening. This coats the inside of the pipes and lowers the freezing point of any remaining water droplets.
As demonstrated in some professional winterization videos, you can also pour a small amount into the pump suction lines through the loosened unions. Some experts recommend adding a second gallon for larger tubs. If you have a saltwater hot tub, follow the same process, antifreeze won’t harm the salt system. Just make sure you use the right type.
Now’s a good time to think about your budget for winterization. If you need financing for a new cover or a service contract, flexible financing options from companies like Up Lending can help you manage those expenses. They offer home improvement loans that cover spa accessories and seasonal service plans.
Step 6: Clean and Secure the Spa Cover
Your cover is the first line of defense against snow, ice, and debris. Before you put it back on, clean it thoroughly. Use a dedicated cover cleaner or mild soap and water. Scrub the top, underside, and all the seams. Pay extra attention to the underside, mold and mildew love dark, damp areas. Rinse well and let it dry completely in the sun. Closing a damp cover invites mold growth inside the tub.
Once the cover is dry, inspect it for cracks, tears, or waterlogged foam. A damaged cover should be replaced before winter. Place the cover on the spa and use the locking straps to secure it. If your cover doesn’t have locks, consider adding wind straps that anchor to the spa’s base. Heavy winter winds can blow a cover off, leaving your drained spa open to snow and ice.
For extra protection, some owners add a tarp over the cover. This shields the cover from UV rays and makes snow removal easier. Just make sure the tarp is vented to prevent condensation. Also, consider placing a low-wattage space heater (like a 100-watt bulb) inside the equipment bay if temperatures will drop well below zero. This small heat source can keep the pump area above freezing and prevent any residual moisture from causing trouble.
If you’re in a desert climate like the Coachella Valley, remember that nights can still get cold. Caldera®Spas recommends maintaining a minimum water temperature of 80°F if you plan to run the tub through winter. Their insulated covers are designed to retain heat efficiently. For those who prefer to drain completely, the tips above will keep your spa safe.
Finally, if you’re planning a winter getaway now that your spa is secure, consider arranging a luxury chauffeur service for your travels. Companies like XM Ride Chauffeur Service in San Diego offer premium transportation to make your trip stress-free.
Frequently Asked Questions
What temperature should I keep my hot tub in winter if I don’t drain it?
If you keep your hot tub running, maintain the water at 102, 104°F for normal use. For freeze protection, never let it drop below 80°F. Many manufacturers set a freeze‑protection mode that kicks in at 40°F, but that’s a last resort. In desert climates, the 80°F minimum recommended by Caldera Spas gives you a safety margin against rapid night‑time cooling.
Can I use automotive antifreeze in my hot tub?
No. Automotive antifreeze contains ethylene glycol, which is highly toxic to people, pets, and the environment. Even small amounts can cause serious harm if the tub leaks or you later fill it with fresh water. Always use pool‑grade or RV/marine‑grade antifreeze (propylene glycol) labeled as safe for potable water systems.
How often should I winterize my hot tub?
Winterize your hot tub whenever you plan to leave it unused for more than a month during freezing weather. If you use the tub regularly all winter, you don’t need to winterize, just keep the water heated and the cover on. For seasonal cabins or second homes, winterize every fall before the first hard freeze.
What happens if I don’t blow out the plumbing lines?
Leftover water can freeze, expand, and crack PVC pipes, damage pump seals, and ruin the heater. Even a small ice blockage can cause a leak that’s expensive to repair. Blowing out the lines is the single most important step in hot tub winterization. Skipping it almost guarantees damage in a hard freeze.
Should I keep the filters in the spa over winter?
No. Remove the filters and store them indoors in a dry place. Dirty filters can grow mold and bacteria, and the oils can harden and ruin the filter media. Clean and dry them thoroughly before storage. If the filters are old, replace them in the spring.
Can I winterize an inflatable hot tub?
Yes, but the process is simpler. Drain the tub completely, deflate it, and store it indoors in a dry location. Never leave an inflatable tub outdoors in freezing weather, the vinyl can become brittle and crack. After draining, wipe down the interior and let it dry before folding.
How do I winterize a saltwater hot tub?
Follow the same steps as a standard hot tub: drain, clean filters, blow out lines, add antifreeze. Before draining, remove the salt cell and store it indoors. Clean any calcium deposits from the cell with a mild acid solution. Protect the cell from freezing by keeping it in a frost‑free location.
What is the best way to remove standing water from the footwell?
Use a wet/dry shop vacuum on suction mode. A sponge or towel works too, but a vac is faster. Many people overlook the footwell, but water here can freeze and damage the shell or float back into jets. After vacuuming, wipe dry with a microfiber cloth for complete peace of mind.
Conclusion
Winterizing your hot tub isn’t complicated, but it does require patience and attention to detail. The payoff is huge: you avoid cracked pipes, broken pumps, and hundreds of dollars in repairs. This guide has walked you through every step, from cutting power and draining water to blowing out lines and adding antifreeze. Each step builds on the last, and skipping even one can lead to trouble.
Remember the key principles: remove every drop of water you can, protect the plumbing with antifreeze, and seal the spa with a clean, secure cover. In dry desert climates, a little extra insulation and a low‑watt heat source in the cabinet can make all the difference during a cold snap.
If you’re in the market for a new spa or want to upgrade your current model to something more winter‑friendly, consider exploring the options at Luxury Hot Tubs. They offer Caldera®Spas with advanced winterization features like insulated covers and remote monitoring. For now, take these steps and rest easy knowing your hot tub is safe until spring.